How to Sort by Date in Google Sheets (+ How to Alphabetize)
If you’re collaborating on a large project with your team, Google Sheets provides easy functionality as well as a user-friendly interface. Discover how to alphabetize and sort by date in Google Sheets.
![[Featured Image] A smiling person sits at their desk at home, looking at their laptop, and learns how to sort by date in Google Sheets.](https://d3njjcbhbojbot.cloudfront.net/api/utilities/v1/imageproxy/https://images.ctfassets.net/wp1lcwdav1p1/X7WP8dEut9pwpb1uKVFEb/856e11cd9f5d8e86951595a7a9330da6/GettyImages-1663317152.jpg?w=1500&h=680&q=60&fit=fill&f=faces&fm=jpg&fl=progressive&auto=format%2Ccompress&dpr=1&w=1000)
Using the Sort functionality, you can order data contained within Google Sheets in various ways. Depending on your task at hand, you may want to sort your Google Sheet in alphabetical, numerical, or chronological order. Sorting a Google Sheet in this way may help you find employee names more easily, organize a financial budget, or group purchase orders based on their shipment dates, among other things.
Learn how to perform related tasks like how to sort a whole sheet and how to filter your data by color, condition, or value, and explore some common problems you may encounter when sorting a Google Sheet, along with ways to resolve them.
Using the Google Sheets sort function: How to sort by date in Google Sheets
The process of sorting a Google Sheets column alphabetically, numerically, or chronologically by date and time is the same for each data type. Sheets can automatically interpret each value and organize your data in ascending (lowest-to-highest) or descending (highest-to-lowest) order. Once you know how to sort a column alphabetically, you will also know how to sort it in numerical and chronological order, and vice versa.
You can review the basic steps here:
Highlight the range of cells you would like to sort.
Freeze the header row, if your sheet has one.
Go to Data in the top menu. Then, go to Sort range and select Advanced range sorting options.
Select Data has a header row if your columns have titles.
Select a column to sort and the sorting rule. If you would like to add another sorting column, select Add another sort column.
Click Sort
Take a closer look at each step.
1. Highlight the range of cells you would like to sort in Google Sheets.
The first step to sorting a column (or columns) is to select and highlight the range of data you will be organizing. A data range can consist of a single cell or multiple adjacent cells, but typically, when sorting, you'll want to highlight the full range of data contained within your sheet because you’ll also want to sort the rows intersecting with the sorted column(s).
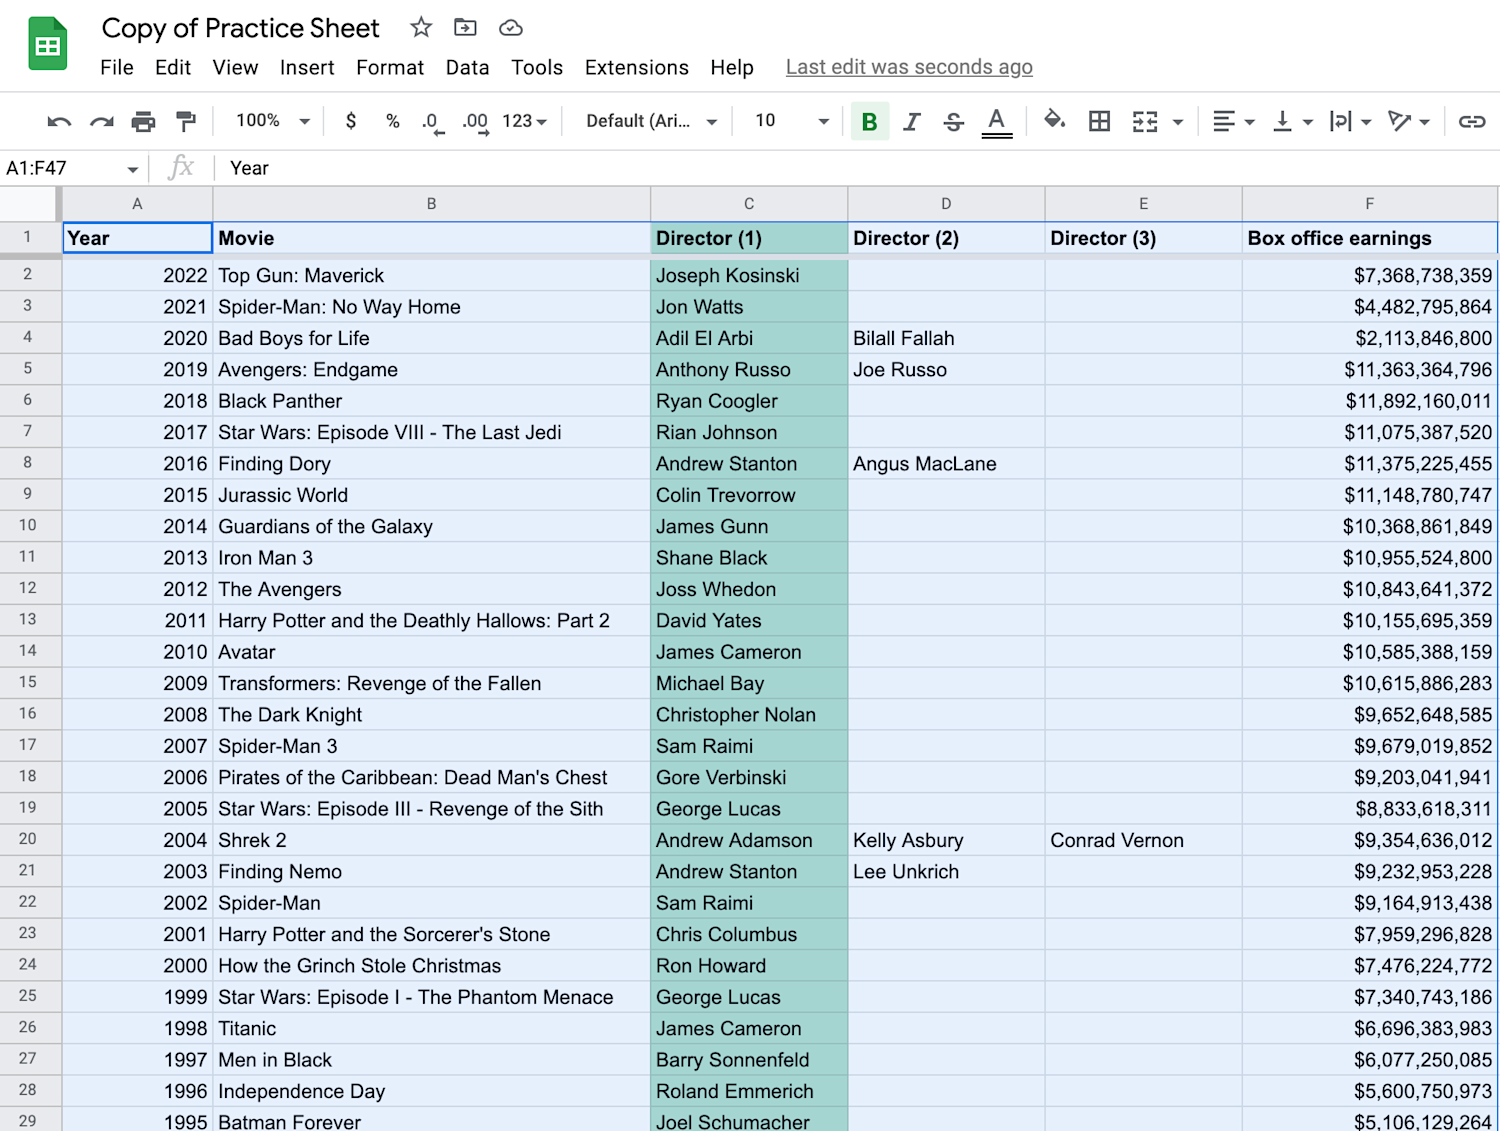
In the image below, for example, the range selected is from cell A1 (in the upper left corner of the sheet) to cell F47 (in the lower right). The exact range you’ll select will depend on the data you are sorting. To highlight a range, click on the upper left cell of the data you are organizing, hold the shift key, and then click the lower right cell of the data you are organizing.
Alternatively, you can also click on the upper left cell of the data you are organizing, hold down on the mouse, and drag your cursor to the lower right cell. Your data range is now highlighted.

2. Freeze the header row (if your sheet has one).
Once you’ve highlighted your data range, you’ll want to freeze the header row by clicking View > Freeze > 1 Row. “Freezing” a row means that you are pinning it in the Google Sheet so that it will remain in the same place as you scroll down the page, keeping the column's header row available for reference. In the graphic below, you can review the visual example of this process.
If you don’t have a header row, then you don’t need to freeze any rows and can move to the next step.

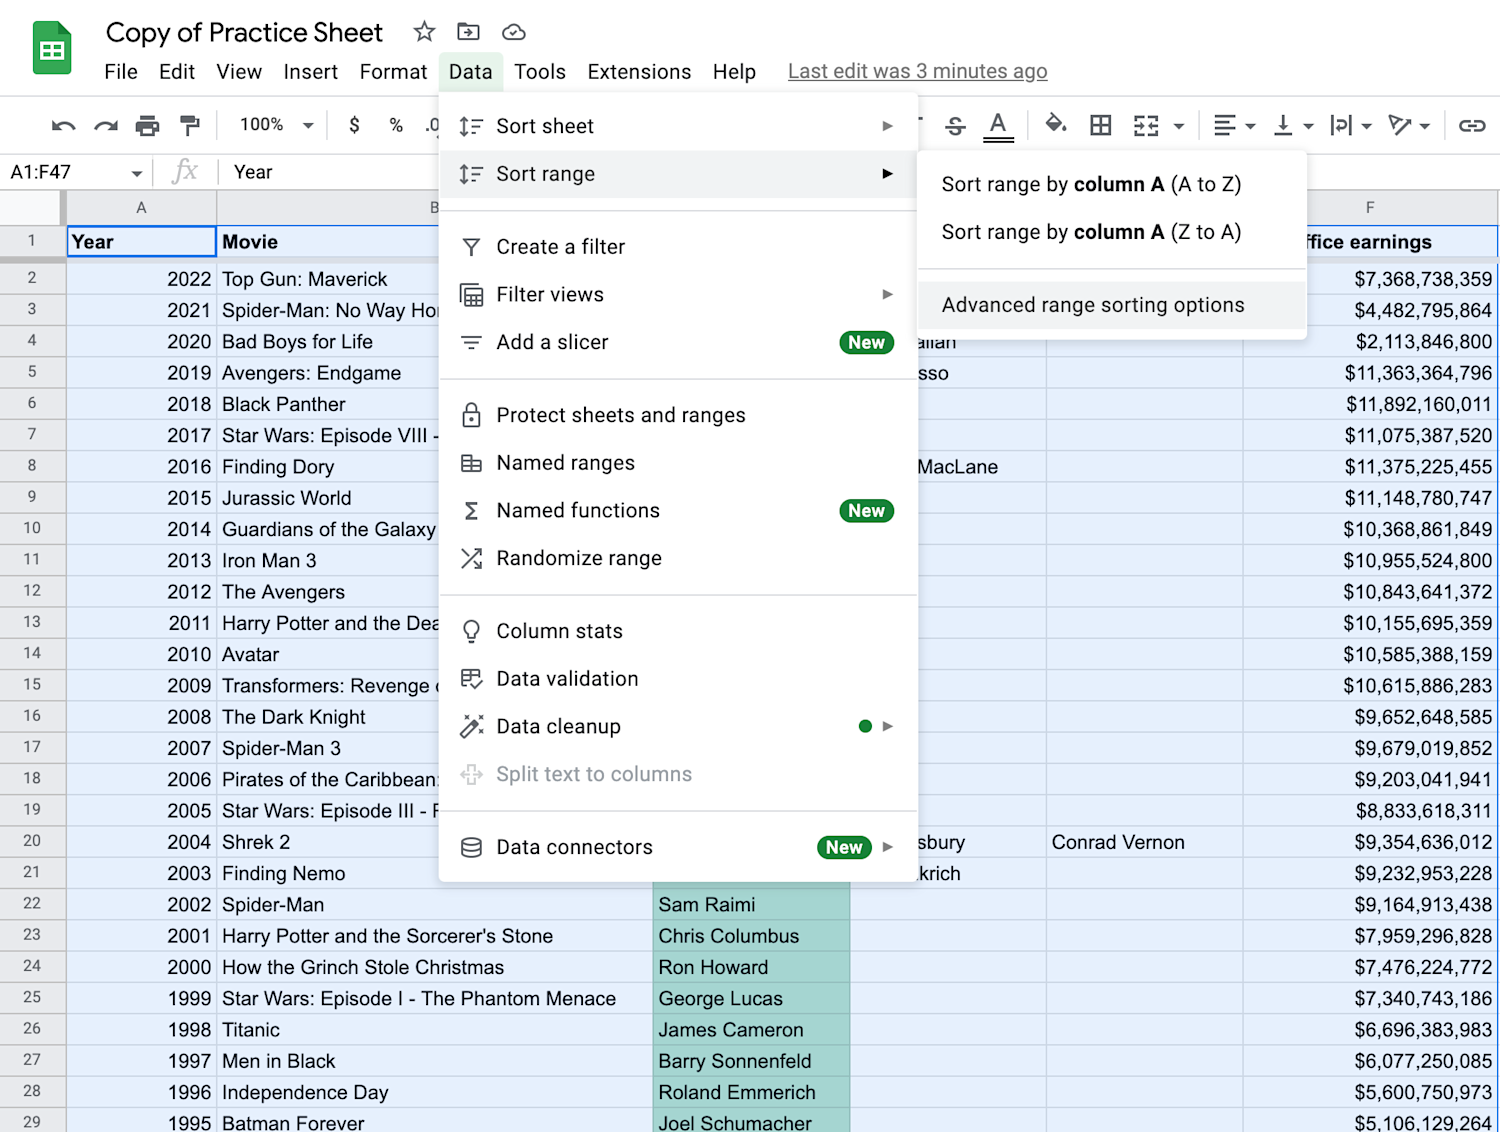
3. Go to ‘Data’ in the top menu. Then, go to ‘Sort range’ and select ‘Advanced range sorting options’.
Now, you're ready to sort your data. Go to the Data menu. Select Sort range > Advanced range sorting options. If you don’t have a header row and only want to sort one column, you can click Sort range by column (A-Z) or (Z-A), which will sort your data range in either ascending or descending order (including the header row), but only for the column containing the first cell of your highlighted data range.
Most users will want to click Advanced range sorting options, however, because it will allow you to sort your entire data range by any column within it, lock the header row so it doesn’t become sorted with the rest of your data, and give you the option to sort multiple columns.
In the event that Sort range by column meets your needs, then once you click it, your data will become sorted in alphabetical, numerical, or chronological order in either ascending or descending order. The outcome depends on the data located in the first highlighted column of your data range and the rule you applied.

4. Select ‘Data has a header row’ if your columns have titles.
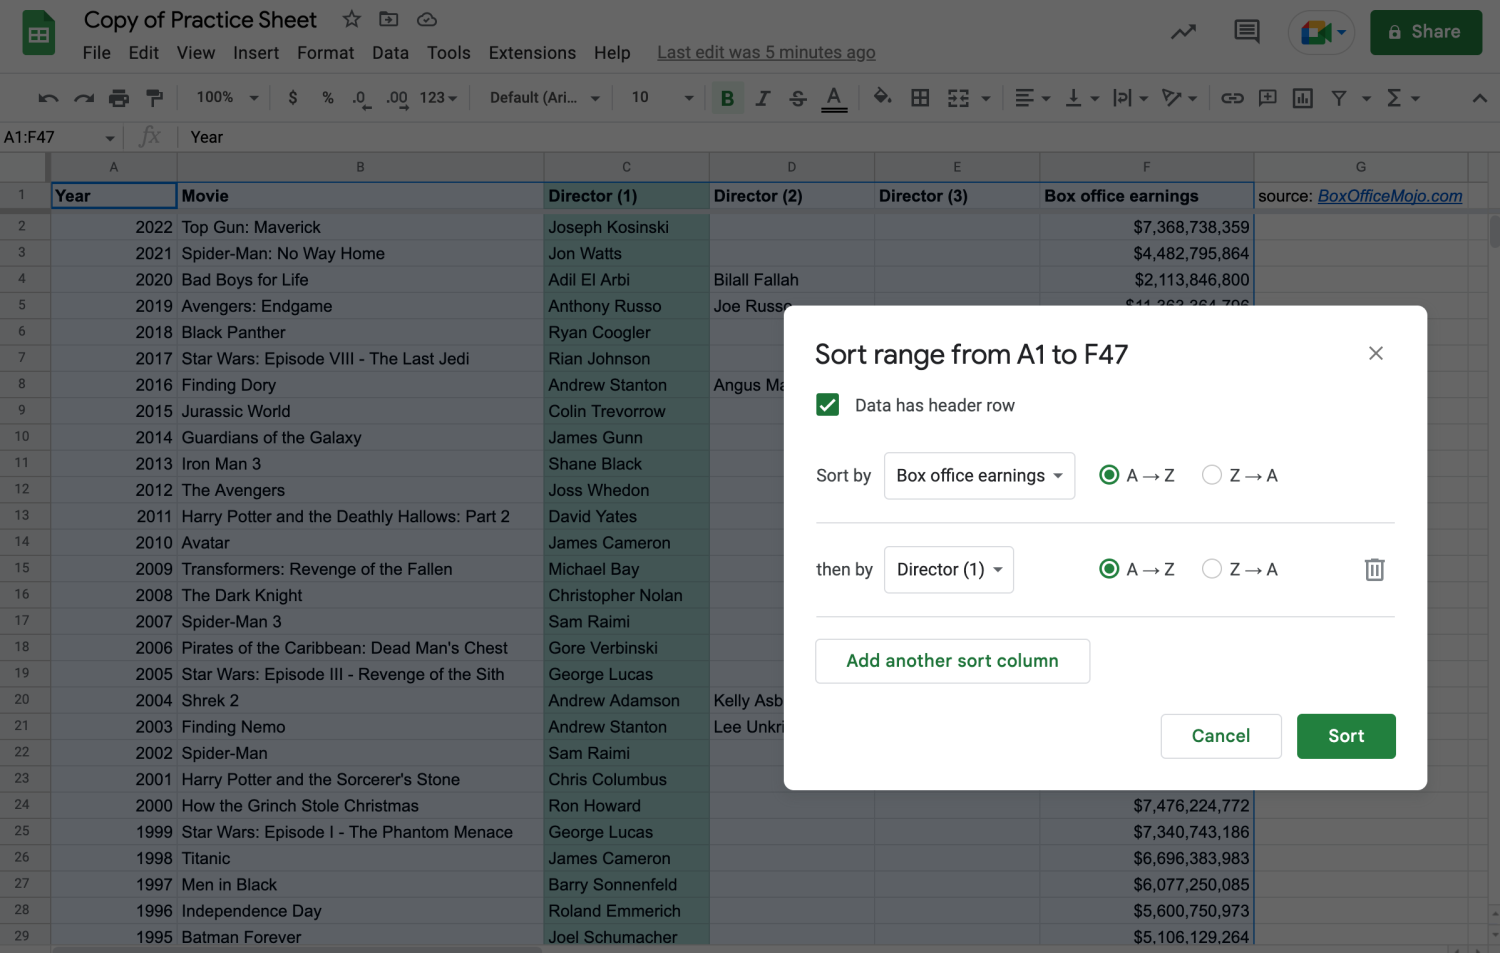
If you clicked Advanced range sorting options in the previous step, then a pop-up window will appear that presents you with the sorting options for Google Sheets. In the window, click the box that says Data has header row, if your sheet has one. Once you click the box, the drop-down menu in the Sort by section will now describe each column by its header name rather than its letter.
The check box for Data has header row will lock the header row of your data range so that it doesn’t become sorted with the rest of the data contained within each column. If you did not lock the header row of the sheet in the image below, for instance, then the header for column C (“Directors”) would become sorted in alphabetical order with the rest of the data in the column.

5. Select a column to sort and the sorting rule. If you would like to add another sort column, click ‘Add another sort column’.
Next, select the column you would like to sort and the sorting rule you would like to apply to it. You can select the column by clicking on it in the drop-down menu contained within the Sort by section. Afterward, select the sorting rule you would like to apply to it by clicking either the button for A → Z or Z → A, which will sort the column in either ascending order from lowest to highest value (A → Z) or in descending order from highest to lowest value (Z → A).
You can add another sorting column and rule by clicking Add another sort column at the bottom of the window, which will create an additional section where you can select another column and sorting rule for it. You can add as many columns and sorting rules as you need, but keep in mind that Google Sheets implements sorting columns and rules in sequential order from top to bottom.
In the image below, for example, the Google Sheet will first sort the data range by the column containing “Box office earnings” in ascending numerical order and then sort that ordering of the data range by the ascending alphabetical order of the “Director (1)” column.

How to sort data in date order using A-Z or Z-A
A-Z organizes data in ascending order from lowest to highest, meaning it will organize your data from top to bottom in either alphabetical order from A to Z or in numerical order from the lowest to the highest number. Z-A organizes data in descending order from highest to lowest value, meaning it will order your data from top to bottom in reverse alphabetical order from Z to A or in descending numerical order from the highest to the lowest number.
Also, if you’re wondering how to sort in Google Sheets by dates and times, A-Z will organize your data from the oldest time down to the most recent, while Z-A will organize your data from the most recent time to the oldest.

6. Click ‘Sort’.
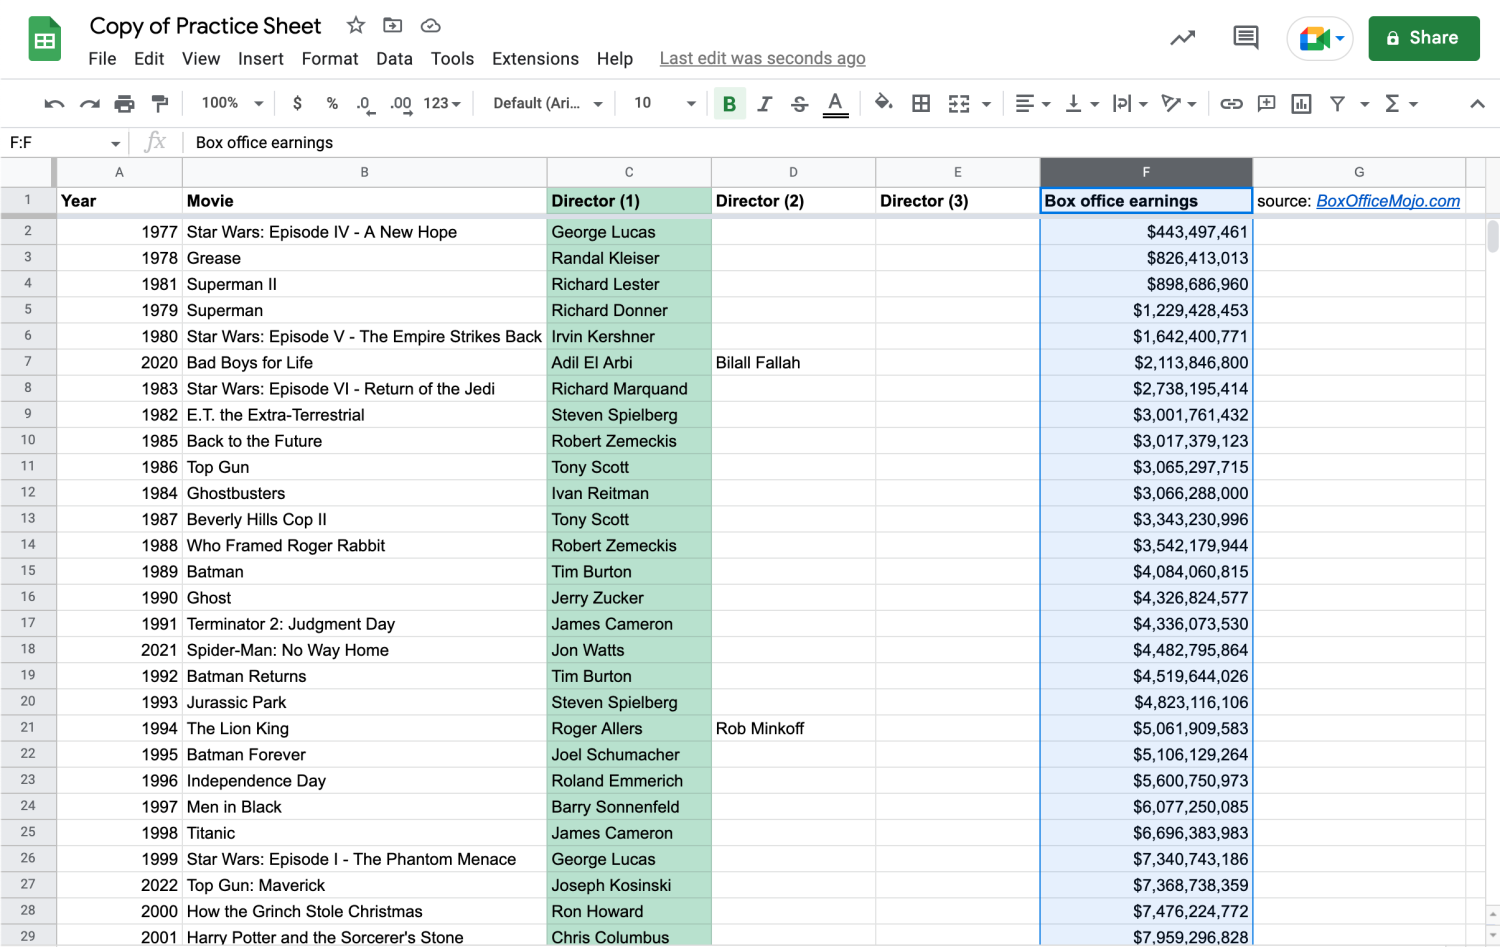
Once you’ve selected the column you would like to sort and its sorting rule, click Sort. The data range will now be sorted in alphabetical, numerical, or chronological order, depending on the data type contained within the column. In the image below, for instance, the column “Box office earnings” is now ordered in ascending numerical order.

What is the difference between sort sheet and sort range?
If you’re sorting by sheet within your Google spreadsheet, then you're organizing all of your data by one column. However, when sorting by range in your spreadsheet, you're simply organizing the data within a range of cells.

Related sorting tasks
Below, you’ll discover how to sort an entire spreadsheet or filter your data range by other factors, such as color, condition, or value.
Sort a whole sheet.
If your sheet contains large amounts of information, Google Sheets can help you organize it for efficient consumption. To sort an entire spreadsheet in Google Sheets, perform the following steps:
Right-click the letter at the top of a column in your spreadsheet, or click the downward-facing arrow beside the letter at the top of the column.
In the pop-up window, click either Sort sheet A to Z or Sort sheet Z to A.
Note: This method will not lock your header row, so it will become sorted with the rest of the data.
Filter your data by color, condition, or value.
You can also filter your data by color, condition, or value in Google Sheets. Take a look at what you’ll need to do:
1. Highlight the data range you will be sorting.
2. Click Data > Create a filter. A downward-facing arrow will now appear at the top of each column of your data range. This symbol indicates that filters are available for the data range.
3. Click the downward-facing arrow located in the top right of each column in your data range. Select either the color, condition, or value filter. To filter the data, select one of the following filters:
Sort by color: You can sort the column by either fill color or text color.
Filter by color: You can also filter the column by either fill color or text color.
Filter by condition: This option allows you to filter the column by a specific condition, such as whether it is empty, contains text, or includes a value greater than a specified number.
Filter by value: For this one, you can filter the column for a specified value, such as a number range or category.
4. Remove filters by clicking Data > Remove Filter.
Troubleshooting and common errors
A common error that occurs when sorting data is that the data contained within the sorted column becomes mismatched from the rows they were previously aligned with. This typically occurs when the cells selected for sorting weren’t the full data range, but instead only the column that was intended to be sorted.
To solve this problem, restore the data to its original order by pressing Ctrl+Z, which will undo the previous sorting action. Next, select the entire data range you will be sorting, including all the rows intersecting with the column to be sorted and all adjacent columns contained within the range. Finally, perform the sorting function as you did previously. You have now sorted your data.
Sort by date and more: Continue learning to work with data on Coursera
If your organization needs to collaborate in the cloud, edit in real-time, and share information with colleagues, understanding how to operate Google Sheets can be a true benefit to your workplace.
Interested in using Google Sheets to strengthen your ability to work with data? Enroll in the Google Data Analytics Professional Certificate on Coursera. You’ll discover more about spreadsheets and other key analysis tools.
Coursera Staff
Editorial Team
Coursera’s editorial team is comprised of highly experienced professional editors, writers, and fact...
This content has been made available for informational purposes only. Learners are advised to conduct additional research to ensure that courses and other credentials pursued meet their personal, professional, and financial goals.